1.3-多线程控制的另一种姿势-条件变量(condition_variable), 信号量(semaphore)
条件变量(C++11)
为什么要引入条件变量
我们先来看看一个由互斥量加锁构成的生产者消费者模型:
//
// Created by Alone on 2022-3-27.
//
#include <iostream>
#include <mutex>
#include <deque>
#include <thread>
std::mutex mtx;
std::deque<int> q;

// producer
void task1(){
    int i = 0;
    while (1){
        std::unique_lock<std::mutex> lock(mtx);
        //std::this_thread::sleep_for(std::chrono::milliseconds(10));
        q.push_back(i);
        if (i < 9999999) {
            i++;
        }else {
            i = 0;
        }
    }
}

// consumer
void task2(){
    int data = 0;
    while (1) {
        std::unique_lock<std::mutex> lock(mtx);
        if(!q.empty()){
            data = q.front();
            q.pop_front();
            std::cout<<"Get value from que task2:"<<data<<std::endl;
        }
    }
}

void task3(){
    int data = 0;
    while (1) {
        std::unique_lock<std::mutex> lock(mtx);
        if (!q.empty()) {
            data = q.front();
            q.pop_front();
            std::cout<<"Get value from que task3:"<<data<<std::endl;
        }
    }
}


int main() {
    std::thread t1(task1);
    std::thread t2(task2);
    std::thread t3(task3);
    t1.join();
    t2.join();
    t3.join();
    return 0;
}
以上代码,由于直接的while(1)循环会导致cpu资源占用的非常厉害,我们可以通过延时sleep_for来进行优化,但这个延时的时间我们并不好控制!
我们这个生产者、消费者线程,想要实现的愿景就是,当生成者生产出资源后,我们能够及时的唤醒消费者线程,让其获取资源。
但如果是简单的对生产者和消费者进行加锁来实现这一过程,可能中间会有很多过程是在消费者拿到锁后,发现生产者并没有生产出资源,而这个过程很明显就是一个无用功,那么有没有一种方式能够让生产者生产出资源后,立马通知消费者线程来读取,且在没有资源的时候,消费者线程能够阻塞让出cpu时间片呢?实现这个需求有很多种方法,而条件变量就是其中的一种!
条件变量的用法
从C++11起,标准库开始引入条件变量。
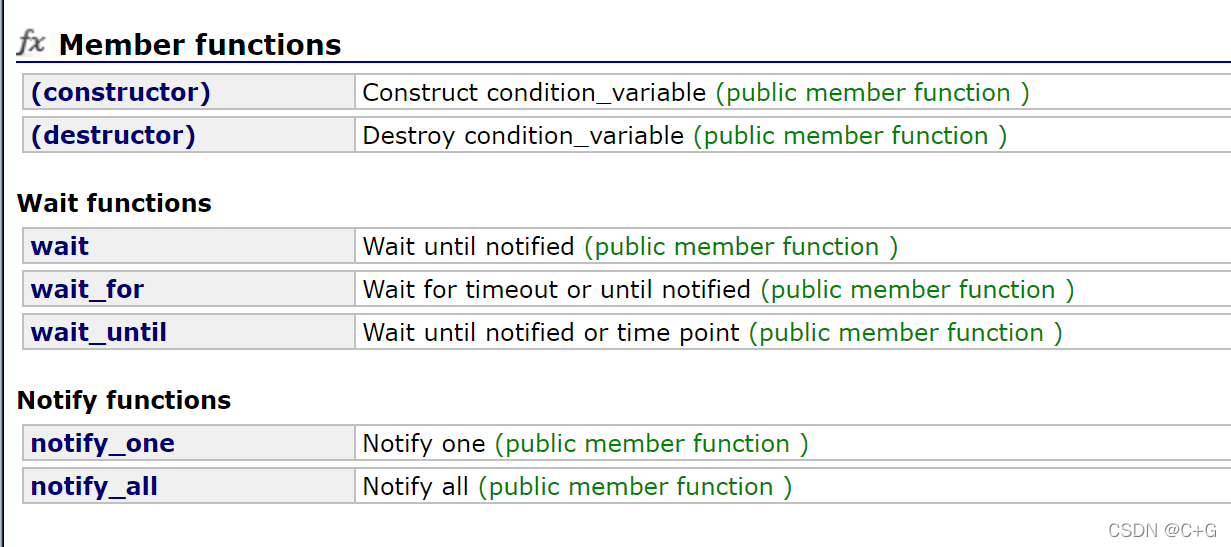
它的成员函数也不复杂,就下面这些:

void wait (unique_lock<mutex>& lck);这是非模板成员函数类型,接收一个unique_lock,调用后,会帮你unlock,并且线程陷入等待状态,直到被调用notify唤醒。
有关notify的成员函数也就这两个:notify_one和notify_all。
顾名思义,随机唤醒一个,和唤醒全部处于等待被唤醒的线程。
我们再利用新学的条件变量改造下前面的代码如下:
#include <iostream>
#include <mutex>
#include <deque>
#include <thread>
#include <condition_variable>
std::mutex mtx;
std::deque<int> q;
std::condition_variable cv;

// producer
void task1(){
    int i = 0;
    while (1){
        std::unique_lock<std::mutex> lock(mtx);
        q.push_back(i);
        cv.notify_one();
        if (i < 9999999) {
            i++;
        }else {
            i = 0;
        }
    }
}

// consumer
void task2(){
    int data = 0;
    while (1) {
        std::unique_lock<std::mutex> lock(mtx);
        if(q.empty()) {
            cv.wait(lock);
        }
        data = q.front();
        q.pop_front();
        std::cout<<"Get value from que task2:"<<data<<std::endl;
    }
}

void task3(){
    int data = 0;
    while (1) {
        std::unique_lock<std::mutex> lock(mtx);
        if(q.empty()){
            cv.wait(lock);
        }
        data = q.front();
        q.pop_front();
        std::cout<<"Get value from que task3:"<<data<<std::endl;
    }
}


int main() {
    std::thread t1(task1);
    std::thread t2(task2);
    std::thread t3(task3);
    t1.join();
    t2.join();
    t3.join();
    return 0;
}
条件变量引发的虚假唤醒
什么是虚假唤醒?
前面我们写的利用条件变量写的生产者消费者线程,我可以肯定的告诉你,它是有问题的,运行起来肯定是会报错的!
这是因为虚假唤醒的原因,那么什么是虚假唤醒呢?
虚假唤醒的意思是,当一个正在等待条件变量的线程由于条件变量被触发而唤醒时,却发现它等待的条件(共享数据)没有满足(也就是没有共享数据)。
简而言之就是:明明当前线程已经被唤醒了,却得不到需要的数据。
虚假唤醒的产生分析:
那么我们来分析一下,上面的代码是如何发生的虚假唤醒,如果出现以下情形:task1刚好生成出一个数据到q中,而此时task2被唤醒,把数据读出后又pop掉,然后进入mutex争夺,进入阻塞或者是得到锁,按理来说,只要notify_one真的只会唤醒一个在等待的线程,那么一个生产者对应多个消费者的情况下,是不会产生虚假唤醒的。后面我多番查找资料,说是在多核处理器的环境下,notify_one可能会唤醒不止一个线程,所以会产生一个虚假唤醒,这就导致明明q是空的,却在被读取!
如何避免虚假唤醒?
一个简单粗暴的避免虚假唤醒的法子就是把if语句改为while语句就行,这个产生的直接作用就是,本来唤醒后会因为没有达到预期情况却还往下执行,而while的加入则确保被唤醒的线程一定要是满足预期情况!
代码如下:
#include <iostream>
#include <mutex>
#include <deque>
#include <thread>
#include <condition_variable>
std::mutex mtx;
std::deque<int> q;
std::condition_variable cv;

// producer
void task1(){
    int i = 0;
    while (1){
        std::unique_lock<std::mutex> lock(mtx);
        q.push_back(i);
        cv.notify_one();
        if (i < 9999999) {
            i++;
        }else {
            i = 0;
        }
    }
}

// consumer
void task2(){
    int data = 0;
    while (1) {
        std::unique_lock<std::mutex> lock(mtx);
        while (q.empty()) {
            cv.wait(lock);
        }
        data = q.front();
        q.pop_front();
        std::cout<<"Get value from que task2:"<<data<<std::endl;
    }
}

void task3(){
    int data = 0;
    while (1) {
        std::unique_lock<std::mutex> lock(mtx);
        while (q.empty()){
            cv.wait(lock);
        }
        data = q.front();
        q.pop_front();
        std::cout<<"Get value from que task3:"<<data<<std::endl;
    }
}


int main() {
    std::thread t1(task1);
    std::thread t2(task2);
    std::thread t3(task3);
    t1.join();
    t2.join();
    t3.join();
    return 0;
}
信号量(C++20)
定义于头文件 <semaphore>
信号量是C++20正式加入标准库的,之前使用信号量都是直接调用Linux或者window的底层API,没有统一的接口。
信号量应该算是操作系统里面的一个概念。
具体而言:
维基百科:信号量(英语:Semaphore)又称为信号量、旗语,是一个同步对象,用于保持在0至指定最大值之间的一个计数值。当线程完成一次对该semaphore对象的等待(wait)时,该计数值减一;当线程完成一次对semaphore对象的释放(release)时,计数值加一。当计数值为0,则线程等待该semaphore对象不能成功直至该semaphore对象变成signaled状态。semaphore对象的计数值大于0,为signaled状态;计数值等于0,为nonsignaled状态.
其中,信号量又分为两种:二进制信号量和计数信号量。
对应到C++20里面的semaphore就是:
std::binary_semaphore 和 counting_semaphore
std::binary_semaphore使用
其实binary_semaphore就是counting_sesmaphore的一个特化而已。
定义如下:
using binary_semaphore = std::counting_semaphore<1>;
讲信号量使用前,我们需要讲讲它的基本运用场景,它一般不使用在存在资源竞争的多线程情况下,比如之前的生产者消费者线程,用信号量是非常不适合的。
比较适合的情况是:某些线程需要在满足某个情况后被通知执行,有点类似于Qt的信号槽机制。
以下有个使用示例:
以下代码已经还有充分的注释了,具体而言就是可以通过release方法让计数器+1,从而使得信号量状态发生改变,由于binary_semaphore只有0和1两个状态,当状态为1的时候,会使得被阻塞的线程激活,而被激活后会立马把状态-1为0,使得其他线程还是被阻塞状态,所以binary的信号量只能通知一个线程执行任务。
以下代码定义了两个信号量,一个是从main线程传递到子线程的信号量,一个是从子线程传递到main线程的信号量。
#include <iostream>
#include <thread>
#include <chrono>
#include <semaphore>


// global binary semaphore instances
// object counts are set to zero
// objects are in non-signaled state
std::binary_semaphore
        smphSignalMainToThread{0},
        smphSignalThreadToMain{0};

void ThreadProc()
{
    // wait for a signal from the main proc
    // by attempting to decrement the semaphore
    smphSignalMainToThread.acquire();

    // this call blocks until the semaphore's count
    // is increased from the main proc

    std::cout << "[thread] Got the signal\n"; // response message

    // wait for 3 seconds to imitate some work
    // being done by the thread
    using namespace std::literals;
    std::this_thread::sleep_for(3s);

    std::cout << "[thread] Send the signal\n"; // message

    // signal the main proc back
    smphSignalThreadToMain.release();
}

int main()
{
    // create some worker thread
    std::thread thrWorker(ThreadProc);

    std::cout << "[main] Send the signal\n"; // message

    // signal the worker thread to start working
    // by increasing the semaphore's count
    smphSignalMainToThread.release();

    // wait until the worker thread is done doing the work
    // by attempting to decrement the semaphore's count
    smphSignalThreadToMain.acquire();

    std::cout << "[main] Got the signal\n"; // response message
    thrWorker.join();
}
counting_semaphore使用
原理与binary版本完全一致只是状态不只是0和1,它能够自定义上限的状态,如下代码,我将上限定为了3,那么release调用的时候可以设置最多+3,那么它就能成功唤醒三个线程.
#include <iostream>
#include <thread>
#include <chrono>
#include <semaphore>


// global binary semaphore instances
// object counts are set to zero
// objects are in non-signaled state
std::counting_semaphore<3>
        smphSignalMainToThread{0},
        smphSignalThreadToMain{0};
void ThreadProc2()
{
    // wait for a signal from the main proc
    // by attempting to decrement the semaphore
    smphSignalMainToThread.acquire();

    // this call blocks until the semaphore's count
    // is increased from the main proc

    std::cout << "[thread] Got the signal2\n"; // response message

    // wait for 3 seconds to imitate some work
    // being done by the thread
    using namespace std::literals;
    std::this_thread::sleep_for(3s);

    std::cout << "[thread] Send the signal2\n"; // message

    // signal the main proc back
    smphSignalThreadToMain.release();
}

void ThreadProc1()
{
    // wait for a signal from the main proc
    // by attempting to decrement the semaphore
    smphSignalMainToThread.acquire();

    // this call blocks until the semaphore's count
    // is increased from the main proc

    std::cout << "[thread] Got the signal1\n"; // response message

    // wait for 3 seconds to imitate some work
    // being done by the thread
    using namespace std::literals;
    std::this_thread::sleep_for(3s);

    std::cout << "[thread] Send the signal1\n"; // message

    // signal the main proc back
    smphSignalThreadToMain.release();
}

void ThreadProc3()
{
    // wait for a signal from the main proc
    // by attempting to decrement the semaphore
    smphSignalMainToThread.acquire();

    // this call blocks until the semaphore's count
    // is increased from the main proc

    std::cout << "[thread] Got the signal3\n"; // response message

    // wait for 3 seconds to imitate some work
    // being done by the thread
    using namespace std::literals;
    std::this_thread::sleep_for(3s);

    std::cout << "[thread] Send the signal3\n"; // message

    // signal the main proc back
    smphSignalThreadToMain.release();
}

int main()
{
    // create some worker thread
    std::thread thrWorker1(ThreadProc1);
    std::thread thrWorker2(ThreadProc2);

    std::cout << "[main] Send the signal\n"; // message

    // signal the worker thread to start working
    // by increasing the semaphore's count
    smphSignalMainToThread.release(3);

    // wait until the worker thread is done doing the work
    // by attempting to decrement the semaphore's count
    smphSignalThreadToMain.acquire();

    std::cout << "[main] Got the signal\n"; // response message
    thrWorker1.join();
    thrWorker2.join();
}